March 27, 2024
March 23, 2024
How to install Ungoogled Chromium

What is Ungoogled Chromium:
In order to understand Ungoogled Chromium, you first need to understand some basic information on the base browser, Chromium.
Chromium is the open-source engine and framework that Google Chrome is derived from; it also functions as the upstream for well-known browsers like the Brave browser.
This does not necessarily mean that Chromium is Google Chrome.
This also does not at all mean that Chromium, as it is, is a private alternative to Google Chrome.
This gap is exactly where Ungoogled Chromium steps in.
Ungoogled Chromium is what its name implies; it is Chromium stripped of its dependencies on Google web services such as "Safe Browsing" and Google Location Service.
This improves your online privacy because it completely eliminates the "phoning home" to Google servers - something that even regular Chromium does.
For example, "Safe Browsing" sends data of the sites you visit to Google to ensure that these sites are "safe." This feature sounds good, but if you follow your standard internet safety checklists, you'll be pretty good at avoiding obviously "unsafe" sites.
The privacy issue with a "Safe Browsing" web search is that Google you're feeding the G machine free information. You can bet that they are recording what sites you visit, when you visit them, how often you visit them, and etc.
Ungoogled Chromium also removes the Google (and other Big Data/Big Tech) defaults.
For example, regular Chromium sets your browser's default search engine to Google. Ungoogled Chromium's default is its "No Search" feature.
Forewarning
While Ungoogled Chromium is a solid Chromium-based browser for privacy, you should be aware that it is not without its faults, which could compromise the general user experience, such as:
Maintained by a small group of developers
Patches come out slower than for standard Chromium (NOTE: Despite this, the developers are very good at being speedy in applying released security updates to the source code)
Binaries are created by volunteers. (This is also a warning that can be found on Ungoogled Chromium's GitHub download page.)
How to install on Linux
Most Linux users also have a couple of different ways to install Ungoogled Chromium. By far the easiest method to accomplish this would be to use Flatpak.
As previously explained, Flatpak has broad support for many different Linux flavors out there. Some distros, such as Linux Mint, have Flatpak installed by default. For those that don't have Flatpak already installed, you will need to install it prior to using this method to install Ungoogled Chromium.
Once Flatpak is installed on your system, you must add the Flathub repo (assuming it has not already been added) using this command: flatpak remote-add --if-not-exists flathub https://flathub.org/repo/flathub.flatpakrepo
Now we're ready for our system to install Ungoogled Chromium: flatpak install flathub com.github.Eloston.UngoogledChromium
Linux users who do not wish to use Flatpak (depending on the distro) can use the source to build their own Ungoogled Chromium package here .
Alternatively, Linux users can also make use of the volunteer binaries for their particular distro.
When using the binaries, if your distro doesn't have a graphical interface to handle the installation for you, then you can always use the terminal to install everything.
Source: https://avoidthehack.com/how-to-install-configure-ungoogled-chromium#linux
Alternate How to get it:
For those that want to try running an Ungoogled (Google tracking removed) version of Chromium, you can download it from the Snap Store or head here for a direct download. Enjoy.
https://flathub.org/apps/com.github.Eloston.UngoogledChromium
https://ungoogled-software.github.io/ungoogled-chromium-binaries/
February 8, 2024
February 2, 2024
How to Install Firefox as DEB on Ubuntu (Not Snap)
So you want to install Mozilla Firefox as a Deb package on Ubuntu 22.04 LTS (or above), not as a snap app.
No problem; in this guide I show you how using the official Mozilla APT repo.
Firefox is the default web browser in Ubuntu but as of 2022 it’s packaged as a snap app, with a traditional DEB version only available for users of Ubuntu 18.04 LTS and earlier.
Worse, if you uninstall the Firefox snap and run apt install firefox assuming you will get a DEB version, you won’t: that install a transition package that reinstalls the Firefox snap.
The Firefox Deb in the Ubuntu repos just reinstalls the Firefox Snap package…
Now, snap packages have plenty of pluses, including improved security, easy access to release channels, options to “undo” updates, less chance of package conflicts or missing dependencies, and more.
But there are also drawbacks to using snaps.
Depending on the software, features may not work in a sandbox; system integration may be lacking; startup times can seem slow; and you won’t be able choose whether to install an update or not, as updates happen automatically, silently in the background.
Although workarounds and fixes many of the issues above do exist (for example, Canonical has added new terminal commands to pause automatic updates for a set duration) the fact you need to scour the web for a solution is not ideal.
So to install a Firefox Deb in Ubuntu 22.04 LTS and above, here’s what you need to do.
Installing Firefox via Apt (Not Snap)
With the release of Firefox 122 in January 2024 Mozilla announced its own dedicated APT repo for Debian-based distros (including Ubuntu). This contains new, stable releases of Firefox as a DEB package.
To add the Mozilla APT repo you should use command line as it’s the most efficient way (and the way Mozilla themselves recommend). You can add the repo using a GUI but it’s a lengthy process and easier to ‘mess up’.
You will also need to ‘pin’ the Firefox Deb package after installation. This will prevent Ubuntu’s transition package from overwriting it to reinstall the Firefox snap.
Note: if you previously added the Mozilla Team PPA to install a Firefox Deb package you should disable or remove the PPA to avoid package conflicts.
Before you go ahead I suggest making a backup/export of important browser settings, bookmarks, and other data from Firefox incase something goes wrong.
When you’re done:
Step 1: Uninstall the Firefox Snap:
sudo snap remove firefox
Step 2: Create an APT keyring (if one doesn’t already exist):
sudo install -d -m 0755 /etc/apt/keyrings
Step 3: Import the Mozilla APT repo signing key (if wget is missing install it first):
wget -q https://packages.mozilla.org/apt/repo-signing-key.gpg -O- | sudo tee /etc/apt/keyrings/packages.mozilla.org.asc > /dev/null
Step 4: Add the Mozilla signing key to your sources.list:
echo "deb [signed-by=/etc/apt/keyrings/packages.mozilla.org.asc] https://packages.mozilla.org/apt mozilla main" | sudo tee -a /etc/apt/sources.list.d/mozilla.list > /dev/null
Step 5: Set the Firefox package priority to ensure Mozilla’s Deb version is always preferred. If you don’t do this the Ubuntu transition package could replace it, reinstalling the Firefox Snap:
echo '
Package: *
Pin: origin packages.mozilla.org
Pin-Priority: 1000
' | sudo tee /etc/apt/preferences.d/mozilla
Step 6: Finally, install the Firefox DEB in Ubuntu:
sudo apt update && sudo apt install firefox
Step 7 (Optional): To use a localised version of Firefox (i.e. the UI in a language other than American English) you need to install the corresponding language package, e.g., for French:
sudo apt install firefox-l10n-fr
You can see a list of all available language packs by running apt-cache search firefox-l10n.
Once you’ve installed everything open the app launcher, click the Mozilla Firefox icon to open your new non-Snap Firefox build, and away you go. Pin the icon to the Ubuntu Dock if you need to.
Sidenotes…
Keep in mind that any bugs, missing features, and missing system integrations with the Firefox snap package (like the ones affecting 3rd-party password managers) are being addressed by Ubuntu developers, so consider hanging tight for a solution.
Otherwise, roll with the Deb as detailed above.
Some of you have asked me how to replace the Firefox Snap with a Deb version (you can also download, move, and link to the Firefox binary as an alternative) but this method feels like the best solution.
Source: https://www.omgubuntu.co.uk/2022/04/how-to-install-firefox-deb-apt-ubuntu-22-04
January 31, 2024
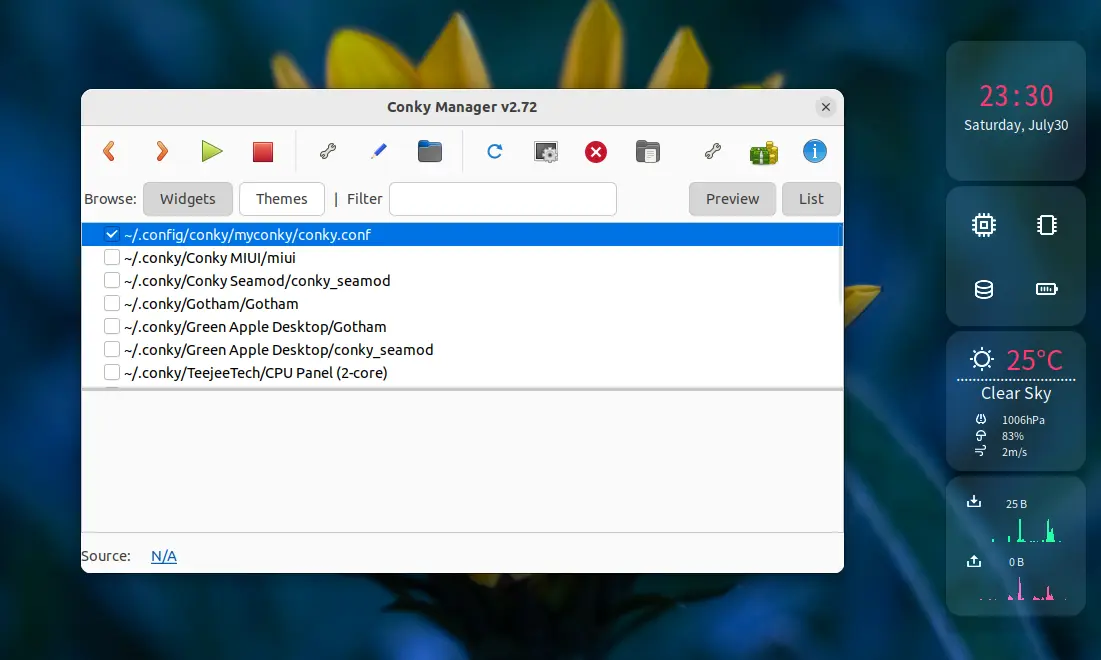
How to Install Conky Manager 2 in Ubuntu 20.04 | Ubuntu 22.04
This simple tutorial shows how to install Conky Manager 2, the graphical front-end for Conky system monitor, in Ubuntu 20.04 and Ubuntu 22.04 LTS.
Conky is a light-weight system monitor for Linux Xorg, that displays CPU, GPU, and disk usage, network speed, weather, date and time and other information on desktop as widget.
And Conky Manager is a graphical tool that manages Conky config files. It provides options to start/stop, browse and edit Conky themes installed on the system.
The software was originally developed by by teejee2008 (Tony George), but not been updated for quite a few years. And Conky Manager 2 takes the job to make it work on recent Linux systems with updated Conky versions support.
Install Conky Manager 2 Ubuntu via PPA:
For those still using conky widget to monitor CPU/RAM, network usage, and weather information, I’ve create an unofficial PPA contains the most recent packages for Ubuntu 22.04 and Ubuntu 20.04, with both 64-bit and arm64/armhf OS types support.
1.) First, open terminal by either pressing Ctrl+Alt+T on keyboard, or searching from ‘Activities’ overview screen. When it opens, run command to add the PPA:
sudo add-apt-repository ppa:ubuntuhandbook1/conkymanager2
Type user password (no asterisk feedback) for sudo prompts and hit Enter to continue.
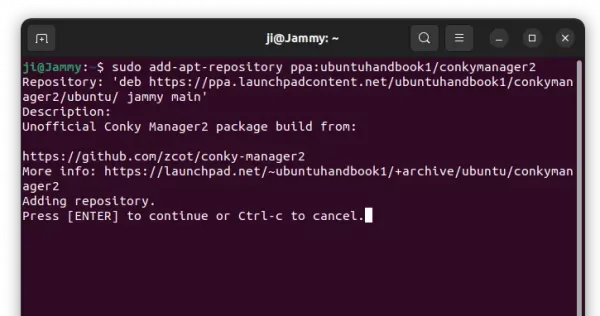
NOTE: Linux Mint needs to manually update cache via
sudo apt update
command first.
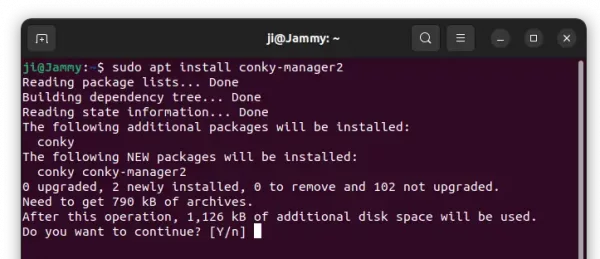
2.) Then install Conky Manager2 and conky as dependency library via command:
sudo apt install conky-manager2
Start and use Conky Manager 2:
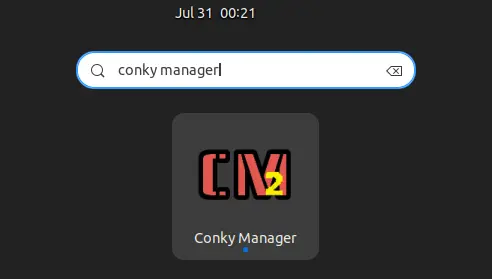
Once installed, search for and launch Conky Manager app from the activities overview screen (or from start menu depends on your DE).
The app comes with some default themes, though may not well configured for your desktop. Tick or un-tick any item in the list will start or stop conky with that theme, though you may also use the tool bar buttons.
And, you can use the “spanner” icon to config theme options, including screen location, size, background transparency. Advanced users may also click on the ‘pencil‘ icon to edit it via configuration file.
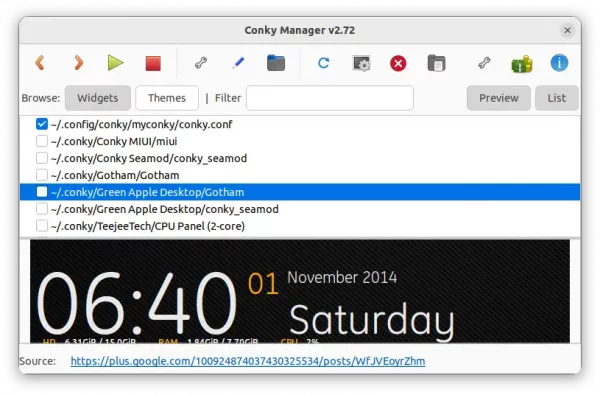
There are also tons of Conky themes on the web. You can download one, and install it easily by clicking the second folder icon (with a little emblem).
Uninstall Conky, Conky Manager:
For any reason, you can easily remove the Ubuntu PPA by running the command below in terminal:
sudo add-apt-repository --remove ppa:ubuntuhandbook1/conkymanager2
If you want to remove Conky as well as Conky manager run command:
sudo apt remove --autoremove conky conky-manager2


Source: https://ubuntuhandbook.org/index.php/2020/07/install-conky-manager-ubuntu-20-04-lts/
January 19, 2024
December 27, 2023
Install & Setup Harmattan Conky Theme in Ubuntu Desktop
Harmattan is a set of conky themes that display a desktop widget on Ubuntu desktop with information of date and time, weather forecast, network speed, and system resource usage.

For those who want to try this conky theme, here’s a step by step how to setup guide:
1. First of all, open terminal (Ctrl+Alt+T) and install conky if you don’t have it via command:
sudo apt install conky-all
2. Download the conky theme via the link below:
3. Extract the tarball, go into result folder and move the .harmattan-assets folder (press Ctrl+H to view hidden folders) to user’s home directory.
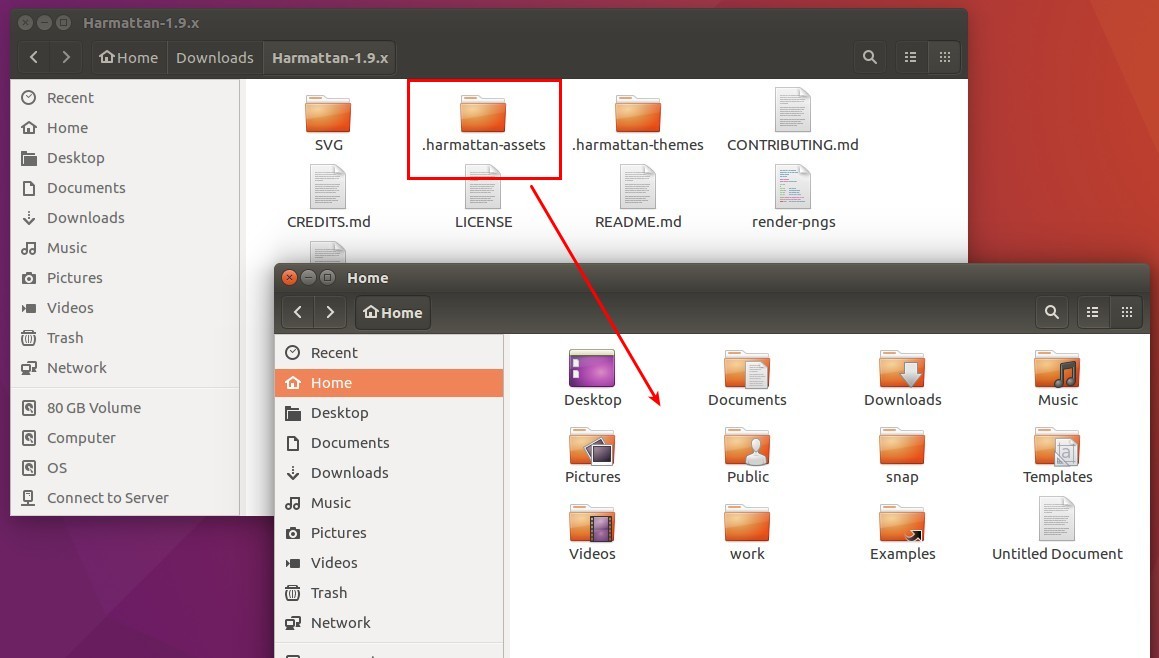
Then open the result folder in terminal:

4. When the terminal opens, run the preview.sh script via command:
./preview.sh
You’ll see a desktop conky widget, now you can do:
- press h or l to switch themes.
- Press j or k to change formats.
- Press n or m to switch modes.
After selected your favorite theme, press i in terminal to setup OpenWeatherMp API and your City ID.

5. Finally open terminal (Ctrl+Alt+T) and run command to edit the .conkyrc file:
gedit ~/.conkyrc

When the file opens, do:
- Change
window_type=to"override"to remove widget border. - Change the value of
gap_xandgap_yto move widget location.
For the network connection issue, find your device name via command:
ifconfig
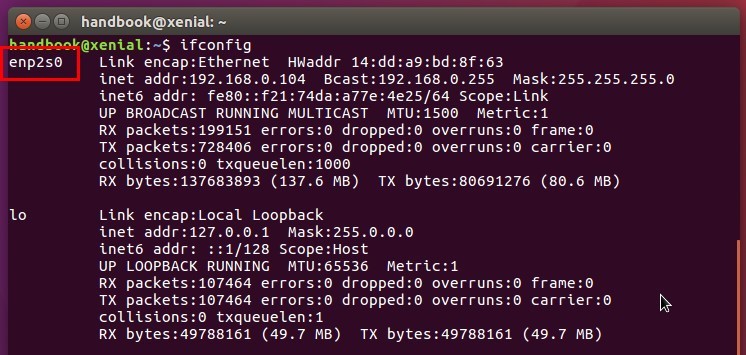
In my case it’s enp2s0, so in the .conkyrc file replace all enp0s1 with enp2s0 (use Search -> Find and Replace … menu).
Finally save the file and enjoy!
Source: https://ubuntuhandbook.org/index.php/2017/05/install-setup-harmattan-conky-theme-in-ubuntu-desktop/
November 22, 2023
Apply Real-Time Effects to Audio on Ubuntu with This App
As you may infer from the name, PulseEffects was built around and designed for PulseAudio. Most major Linux distributions have switched from PulseAudio to PipeWire for their audio handling.
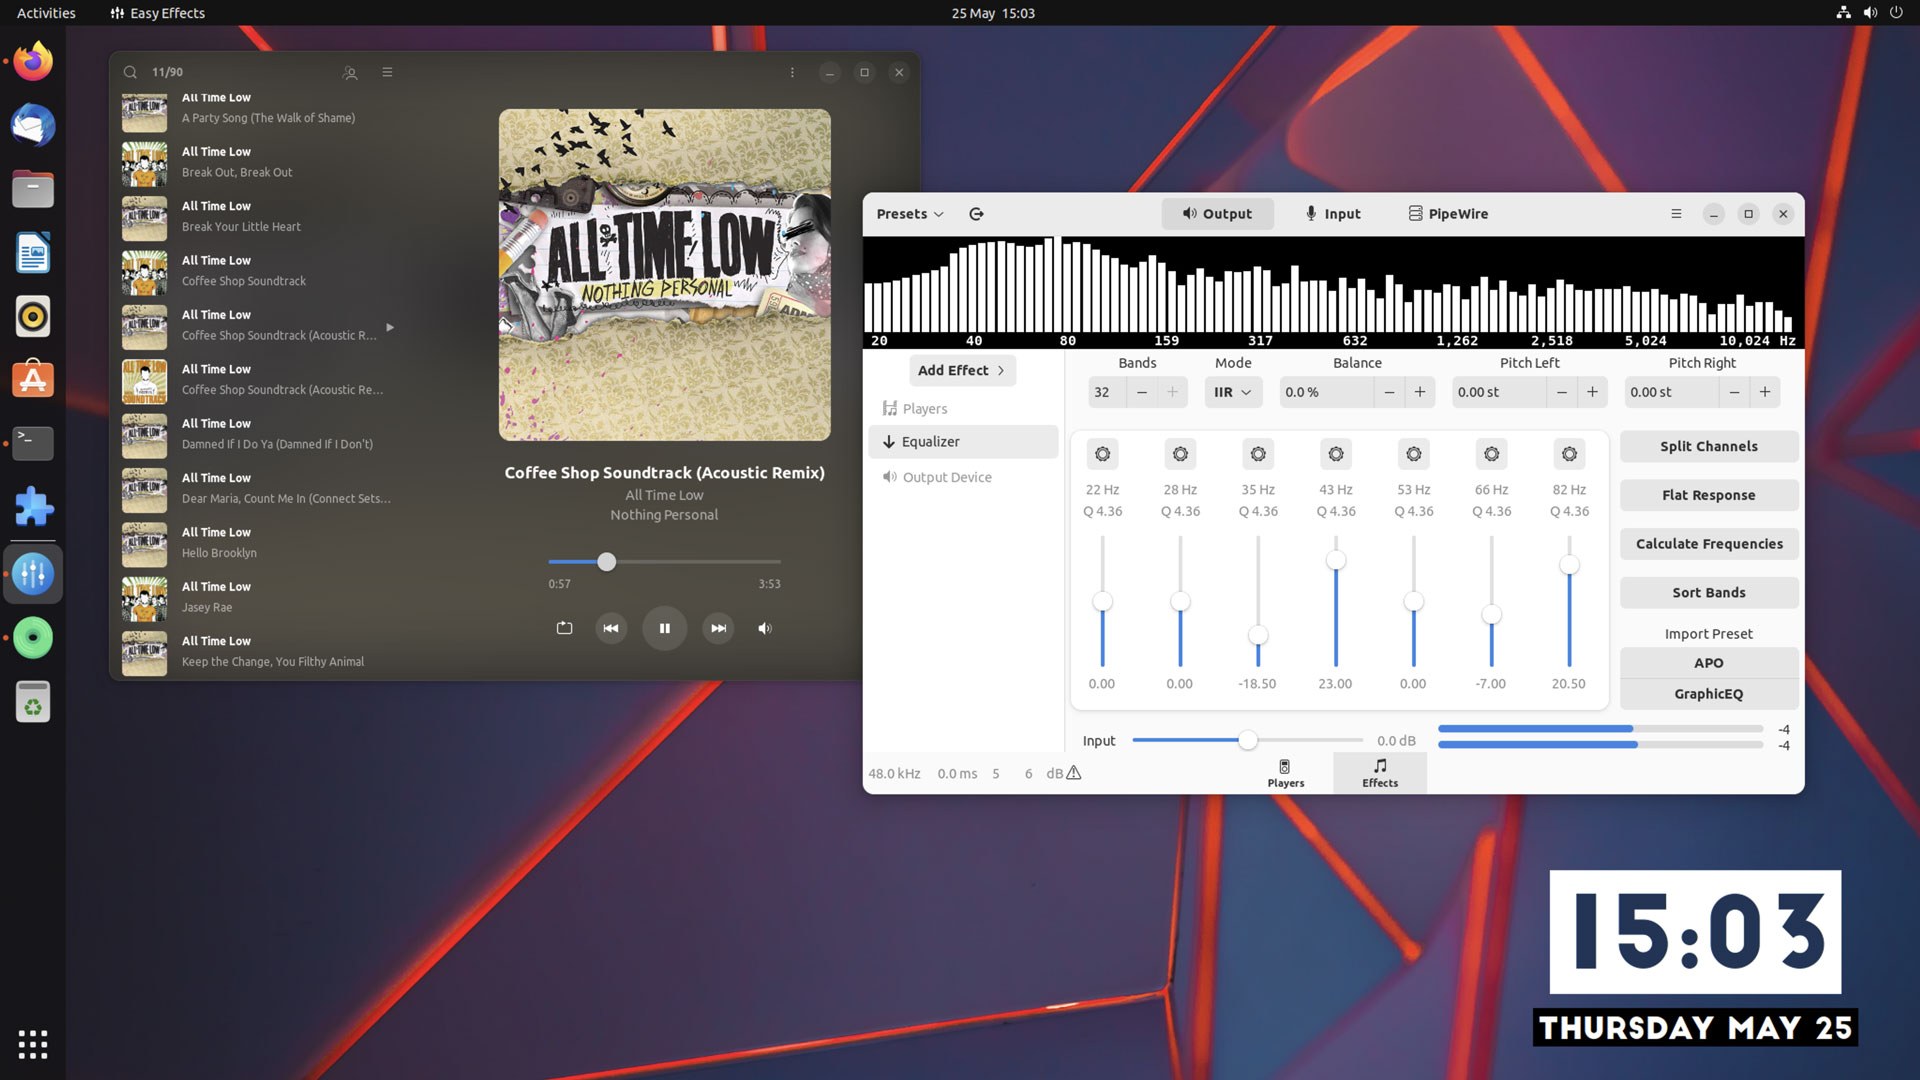
Enter Easy Effects, a successor to PulseEffects that sports a modern GTK4 interface, and an expanded set of features that enable to function as a powerful audio effects processor for PipeWire applications. It offers an equalizer, limiter, and compressor (among others) and a built-in spectrum analyser.
You can apply equalizer adjustments to music played on Ubuntu in your favourite music player (e.g., Spotify) without affecting ALL of audio on your system. Similarly, you could apply an effect that does affect all your system audio, e.g., to unlocking richer sound from your hardware.
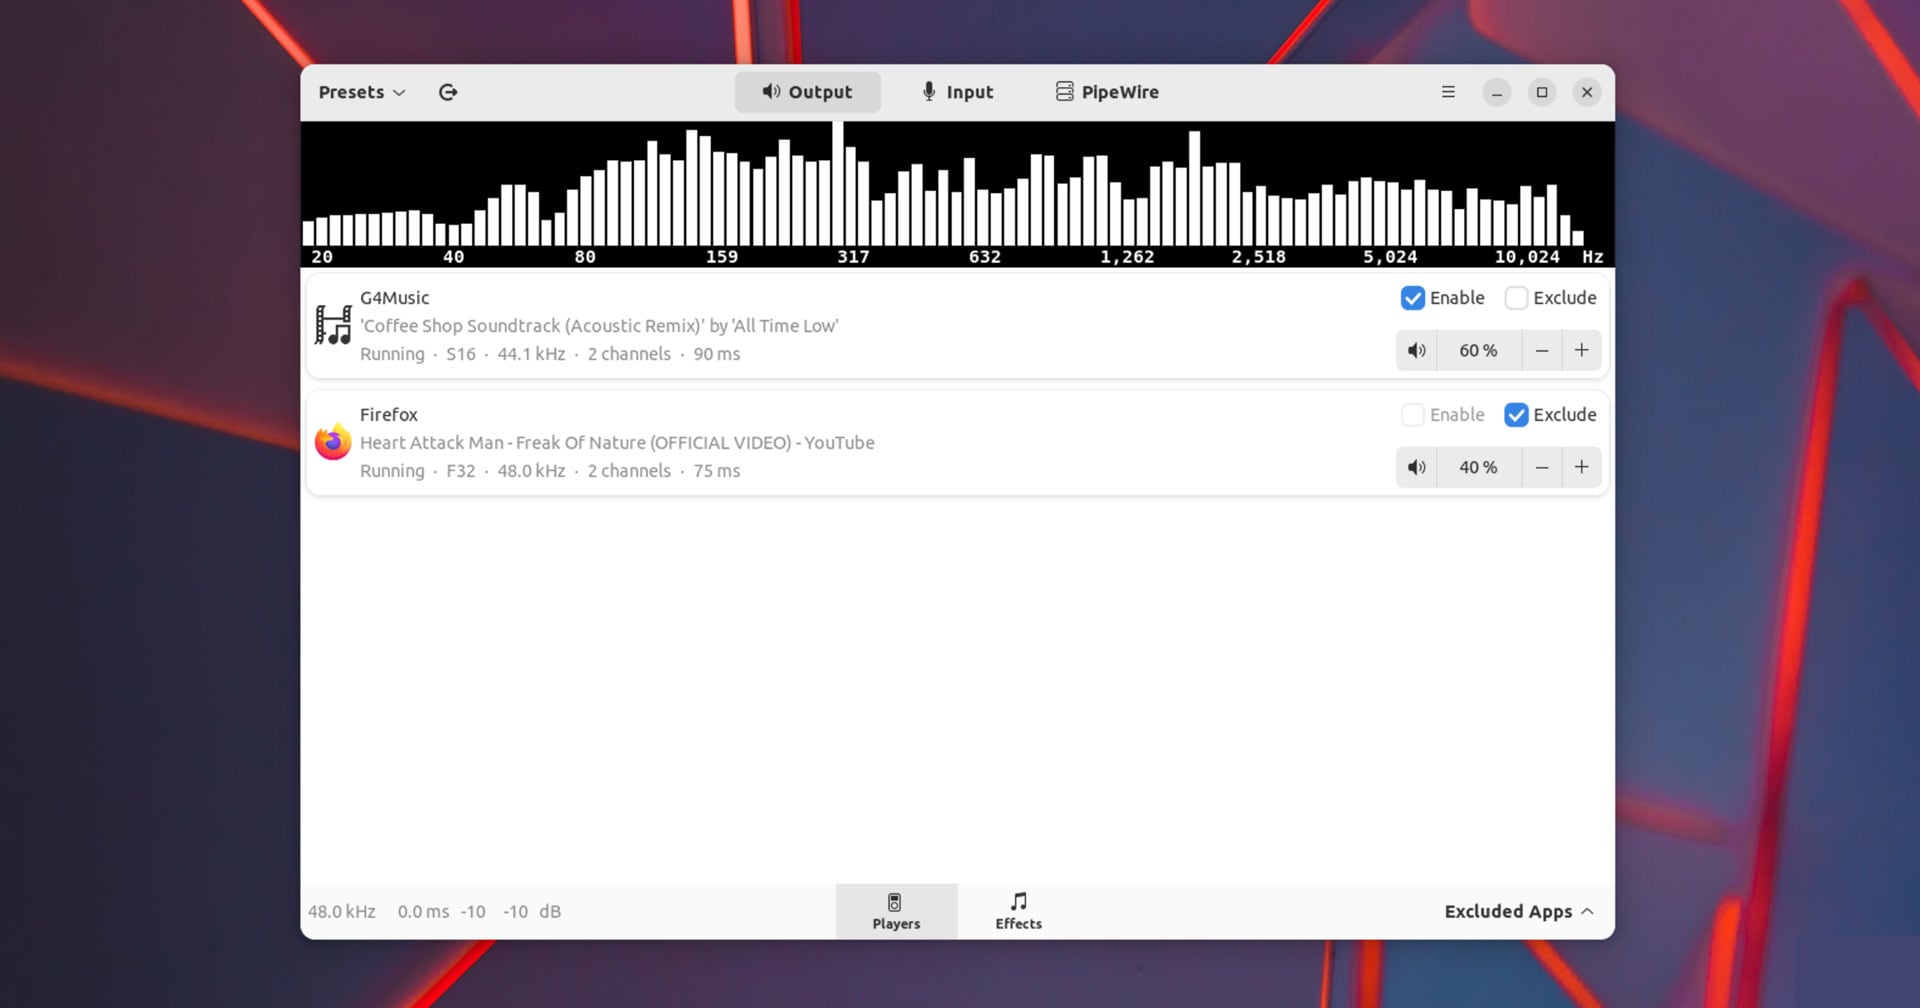
In addition to sculpting sound output, Easy Effects is able to apply audio effects to sound input (e.g., microphone). This is a great way to add real-time effects to audio in a call, stream, presentation, or podcast. Or, in my case, just to amuse yourself!
Effects (usually, though they may vary by distro) available OOTB include:
- Auto gain
- Bass enhancer
- Bass loudness
- Compressor
- Convolver
- Crossfeed
- Crystalizer
- De-esser
- Delay
- Echo Canceller
- Equalizer
- Exciter
- Filters (various)
- Gate
- Limiter
- Loudness
- Maximizer
- Multiband compressor
- Multiband gate
- Noise reduction
- Pitch
- Reverberation
- Speech Processor
- Stereo tools
As well as having lots of control over each effect you’re also in control of the effects order, and you can turn off any effect at any time without removing it (and losing your modifications), and save settings to re-use at a later date.
High Quality Presets Available
Now, I am not an audio expert. I don’t really know what all the switches and sliders and effects in this app do — but thankfully, I don’t need to.
Pre-made audio presets are available to download from the developer’s EasyPulse repo. Simply download a config, load it into the app, and bam, you can instantly benefit from audio optimisations made by someone who knows what they’re doing!
Install Easy Effects on Ubuntu
You can install Easy Effects on Ubuntu direct from the repos in Ubuntu 22.10. This is recommended as it ensures the version of the app you install plays nice with the version of PipeWire on your system. Run a sudo apt install easyeffects to get it.
If you fancy fiddling with the most recent release, or on other versions of Ubuntu, you can get Easy Effects on Flathub. I tried this build on Ubuntu 22.10 and received a warning that my PipeWire version was too old to play nice with the app — I ignored this and it worked fine for me, but YMMV.
For more information check out Easy Effects on GitHub.
Source: https://www.omgubuntu.co.uk/2023/05/easy-effects-ubuntu
October 3, 2023
Professional DAW ‘Studio One’ is Now on Linux (Public Beta)
PreSonus has made Studio One, their powerful digital audio workstation, available on Linux for the very first time!
Studio One is a (closed-source) all-in-one DAW that lets you create music from scratch using virtual instruments, loops, and composer tools; capture audio from connected instruments and other audio equipment; and mix, master, and export compositions to professional standards.
It offers a fully-featured multi multitrack recording and editing environment where you can record, arrange, and edit row after row of audio and MIDI tracks; and use advanced automation, effect chains, and plugins to sculpt, manipulate, and play round with how ‘sound’ sounds.

I’ll admit most of this DAW’s features are lost on me as I’m not a music producer. But if you are, if you’re a musician, a podcast maker, or someone wanting to amp up their audio workflow using the same tools the “pros” use, Studio One is worth looking in to.
Studio One joins Bitwig, Tracktion Waveform, and REAPER, and FOSS faves Ardour and Audacity, in catering to music makers on Linux. While preferences towards proprietary software differ, seeing yet another big-name DAW add official support for Linux is, to my mind, a big deal.
Get Studio One for Linux (Beta)
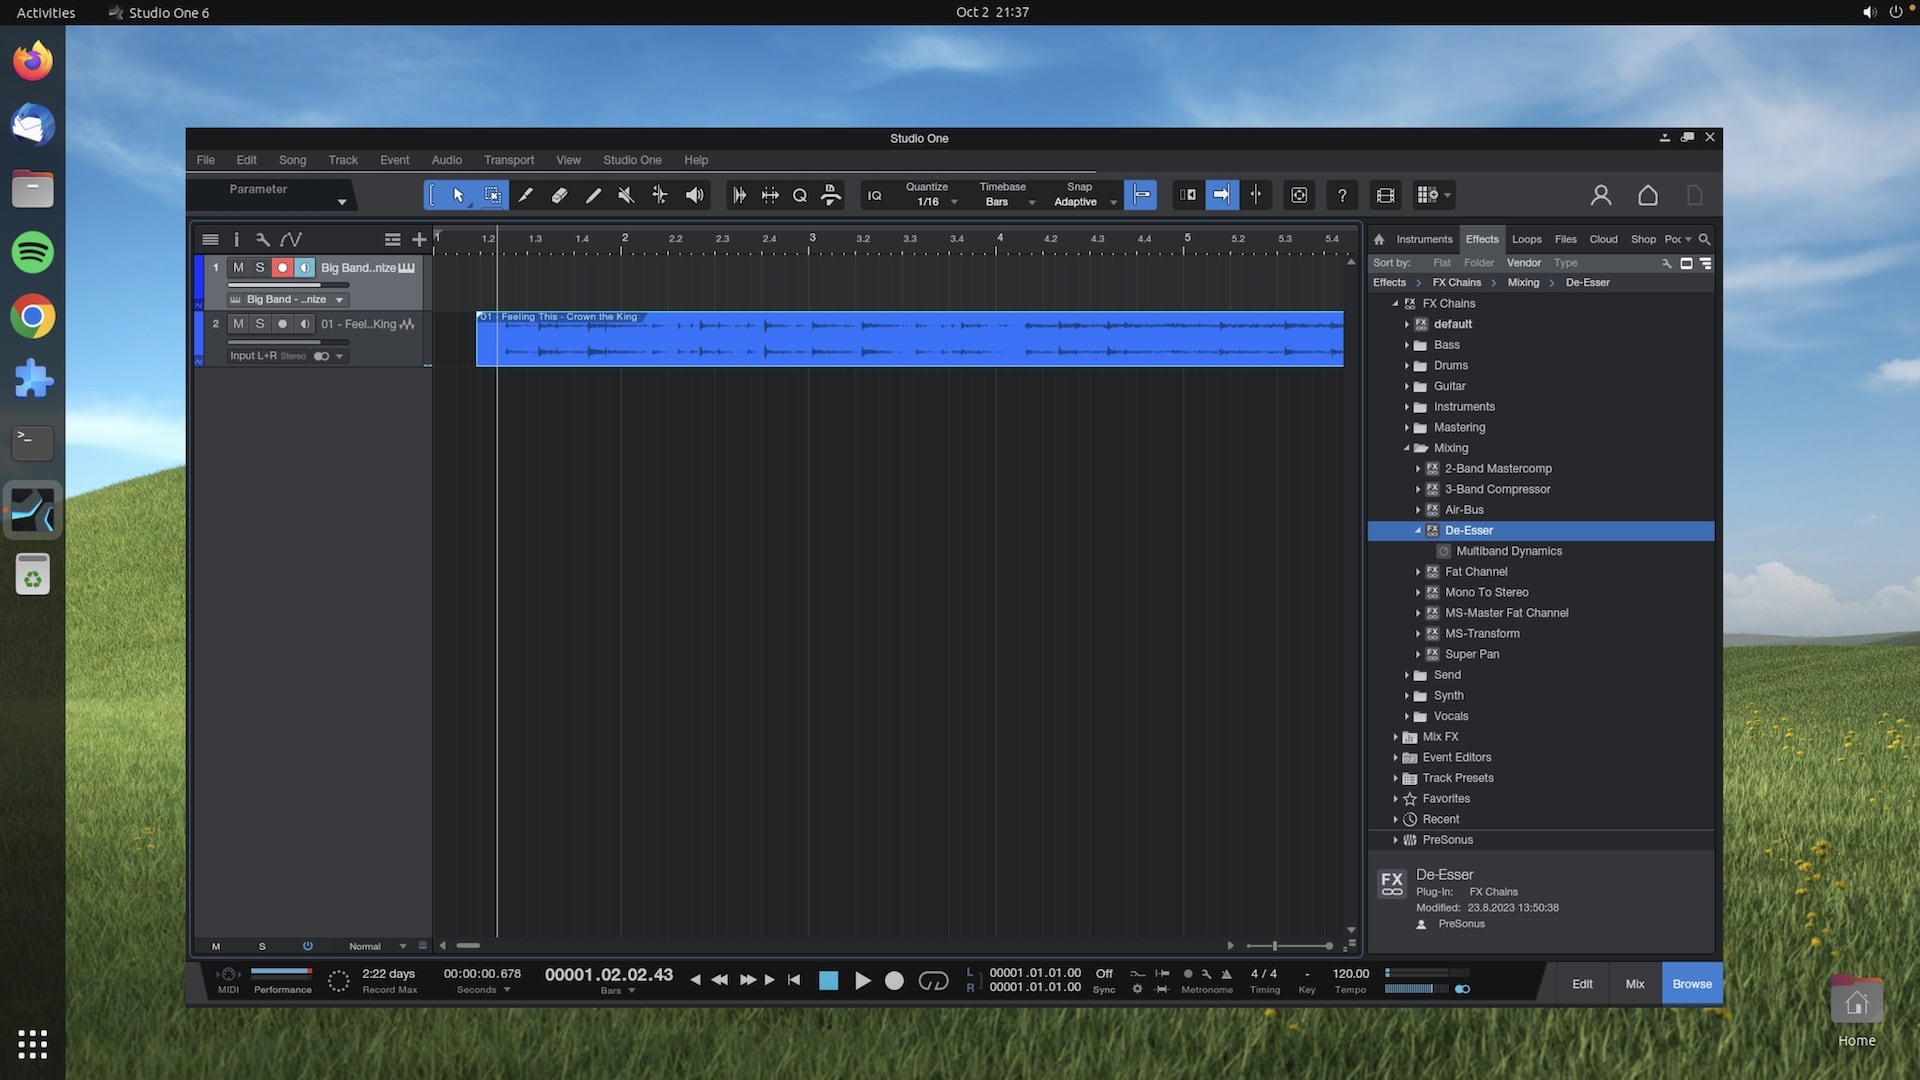
The Studio One 6.5 Linux beta explicitly supports Ubuntu 23.04 with Wayland only. It also requires an Intel Core i3 or AMD A10 processor (or better), a Vulkan 1.1-compatible graphics card, and a fully functional JACK audio server.
ProSonus isn’t providing any official support for the Linux beta right now, and there are a slew of known issues and feature limitations, most of which are noted on the Studio One Linux support page.
Although Studio One is not free software it does offer a free tier called “Prime”. This is (surprisingly) liberal, with unlimited audio and MIDI tracks and access to a decent selection of effects. It’s just not easy to find – so you’ll have to sign up and select a free demo first.
Beyond that, a $99 ‘Artist’ edition ads in more tools and allows you to use 3rd-party VSTs and AU plug-ins; or you can opt for a Studio One+ subscription to access ‘Professional’, which includes costly effects like Melodyne, cloud storage for projects, and access to masterclasses and online content.
If you’re interested in sampling Studio One to see how well it runs on Linux — and you really do need a good computer to get the most from it — do take advantage of the free plan/demo first (and be aware that features/apps in other plans may not work on Linux anyway).
To download the Linux build sign-up for a MyPreSonus account (free), select the free 30-day Pro demo option in your account settings1, then download the .DEB file from your account page (and any of the .soundset files you think you want/are available to you).
Then install like you would any other DEB (the app requires a number of Qt dependencies and online activation during first run, so make sure you’re online when you’re setting it up).
Stop by the Studio One Linux forum for help/advice from fellow Linux users.
Thanks Micah
Source: https://www.omgubuntu.co.uk/2023/10/pro-audio-app-studio-one-now-supports-linux
June 6, 2023
FLACON FLAC Splitter
Flacon extracts individual tracks from one big audio file containing the entire album of music and saves them as separate audio files. To do this, it uses information from the appropriate CUE file. Besides, Flacon makes it possible to conveniently revise or specify tags both for all tracks at once or for each tag separately.

Features:
Supported input formats: WAV, FLAC, APE, WavPack, True Audio (TTA)
Supported out formats: FLAC, WAV, WavPack, AAC, OGG or MP3
Replay Gain analysis: ALBUM-gain and TRACK-gain modes
Multi-threaded conversion process
Automatic character set detection for CUE files
Generation of the pertrack CUE file in the output dir
Ubuntu
Ubuntu users can use repository at launchpad. Open up a terminal and input these commands:
sudo add-apt-repository ppa:flacon
sudo apt-get update
sudo apt-get install flacon
Debian 11
echo "deb http://download.opensuse.org/repositories/home:/Sokoloff/Debian_11 ./" | sudo tee /etc/apt/sources.list.d/flacon.list
wget http://download.opensuse.org/repositories/home:/Sokoloff/Debian_11/Release.key -O- | gpg --dearmor | sudo tee /etc/apt/trusted.gpg.d/flacon.gpg
sudo apt-get update
sudo apt-get install flacon
FLATPAKs are also available.
Source: https://flacon.github.io/
Source: https://alternativeto.net/software/flacon/about/
June 1, 2023
Tube Converter Gets New Backend for Improved Stability
A major update to Tube Converter is now available.
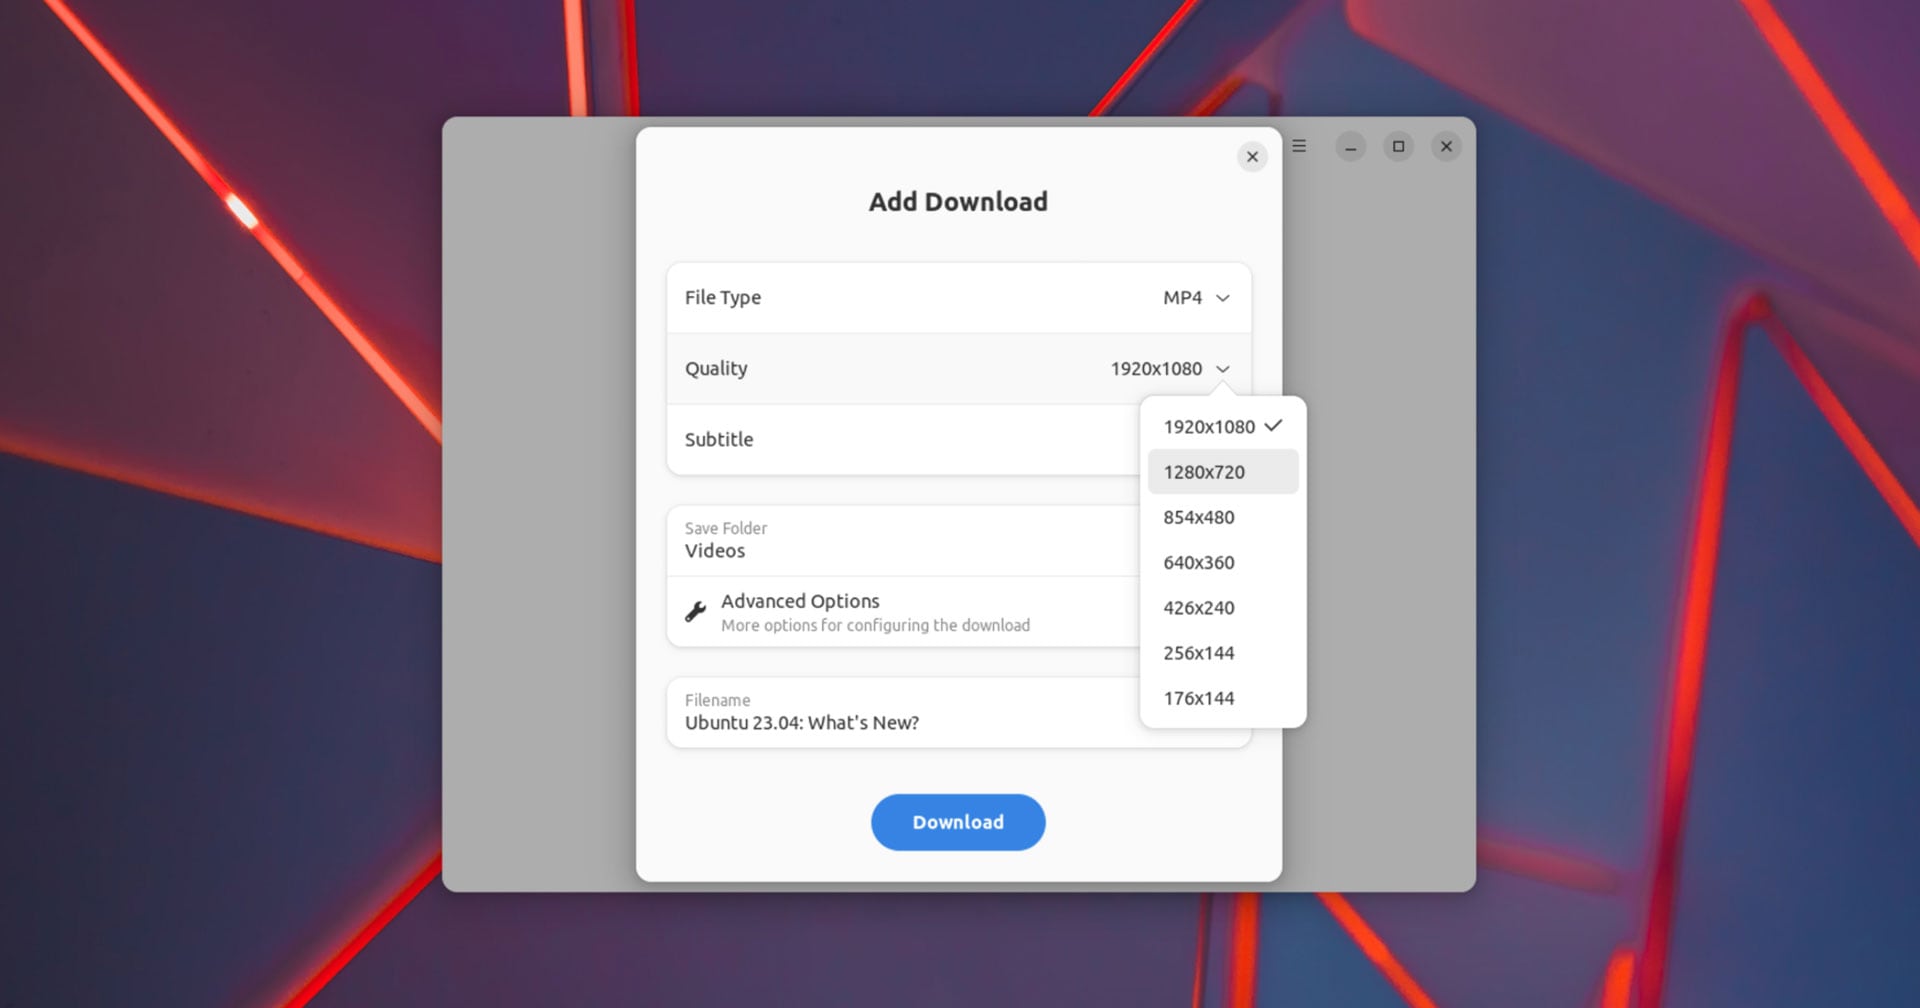
If you’re not familiar with this GTK4/libadwaita app, it’s a GUI tool that makes it easy to download videos from YouTube (assuming you have permission, etc) and a number of other popular video streaming sites.
Tube Converter is powered by the popular yt-dlp engine, providing a sleek, user-friendly front-end to many of that tool’s features. It lets you download multiple videos at a time in a variety of formats, including MP4 and WEBM, and audio-only MP3, FLAC, and WAV.
Latest Tube Converter Features
There have been a couple of sizeable updates to Tube Converter of late (including a C# rewrite) and that trend continues. Tube Converter v2023.5.0 gets a brand new backend that, the developer of the app says, greatly improves its stability — and we all appreciate that.
Additionally, the app now provides options to stop all downloads; retry all failed downloads; and clear all queued downloads. These are useful on their own, but combined with the pre-existing queue features, make managing all downloads, active, failed, and completed, easier.
If you’re keen to download videos at a specific resolution you’ll appreciate that Tube Converter now lets you pick specific resolutions for video downloads instead of giving you transcribed qualities of Best, Good, Worst, etc.
Want to take Tube Converter for a ride?
The recommended way to get the app is to install Tube Converter from Flathub
as this supports pretty much every modern Linux distro out there,
though if you’re on a Linux distro that supports it you can also get it from the AUR, and a Tube Converter snap is available from Canonical’s Snap Store.
Source: https://www.omgubuntu.co.uk/2023/05/tube-converter-linux-app-new-features
March 3, 2023
How to install 80211AC wireless drivers in Linux

For years I have struggled getting my Realtek Semiconductor Corp. 802.11AC NIC USB stick to work on Linux. Below are how to enable these drivers. I got the wireless USB stick on eBay and it comes with an install disk. But the installation was just too technical. Below are the how to terminal commands to enable this. Now I can enjoy the 200GB download speeds my ISP is providing. Enjoy.
Note: For my Realtek Semiconductor Corp. 802.11AC NIC USB stick, the commands are:
sudo apt update
sudo apt install build-essential git dkms
git clone https://github.com/brektrou/rtl8821CU.git
cd rtl8821CU
chmod +x dkms-install.sh
sudo ./dkms-install.sh
sudo modprobe 8821cu
Source: https://forums.linuxmint.com/viewtopic.php?t=324111
Source: https://forums.linuxmint.com/viewtopic.php?t=324111
December 22, 2022
How to upgrade Linux Mint 20.3 to 21.1
Linux Mint 21.1 has just been released. For those that want to upgrade to the new release, it is a simple matter. Below are the steps from a helpful article.
Upgrade to Linux Mint 21 and 21.1 from Mint 20.3 [Complete Guide]
This guide gives you all the information you need to Upgrade to Linux Mint 21 series from Linux 20.3.
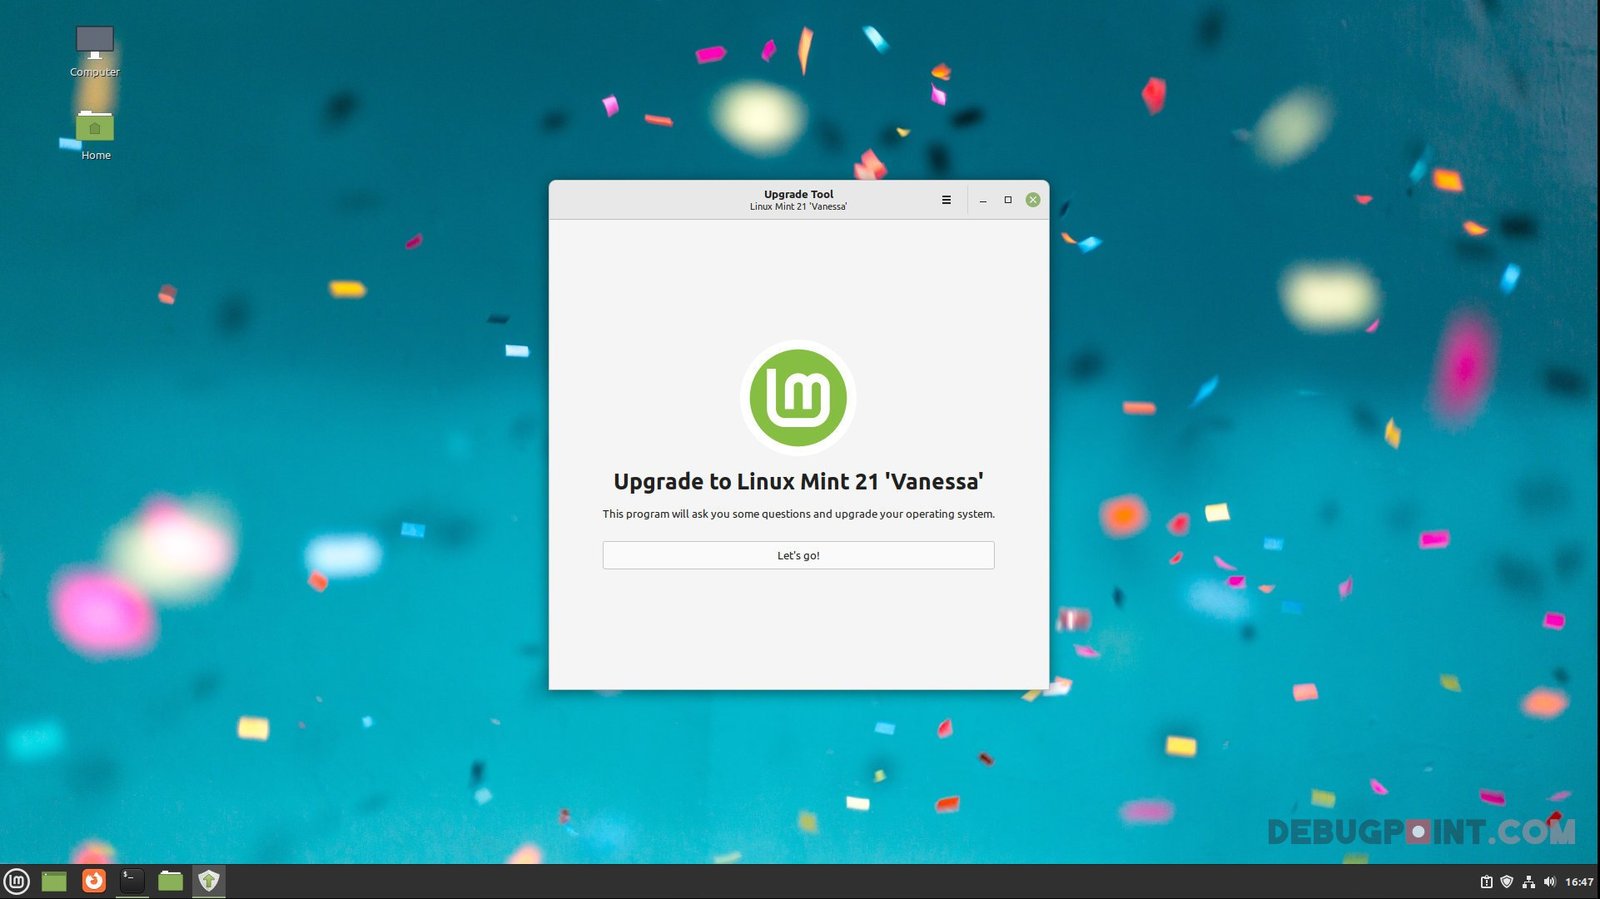
Linux Mint 21 “Vanessa” and 21.1 “Vera” was recently released with the latest Ubuntu 22.04 base and other additional features. If you are running the earlier Linux Mint 20.3, now it is possible to do a major version upgrade using the graphical tool by Linux Mint.
But before you upgrade, you need to do some housekeeping because major version upgrades always come with a fair amount of risk.
That said, make sure of the following before performing the upgrade.
Before you perform the upgrade, remember the followings:
- The current version upgrade is only possible from Linux Mint 20.3 to Linux Mint 21 and 21.1.
- What does this mean? If you are running Linux Mint 20.2 or Linux Mint 20.1, you can not directly upgrade to 21. Instead, you need to perform
sudo apt updateandsudo apt upgradeto reach 20.3. And then follow the steps.
Things to do before the Upgrade Attempt
- Open the Update Manager and make sure your system is up to date until Linux Mint 20.3.
- Use TImeshift to create a system restore point after you apply all the pending updates in the above step. If something happens, you can always restore it to this point in time.
- Take a backup of all of your home, downloads, documents, pictures and videos folders.
- Disable any third-party PPA that you may have added. You can find those in the
System Settings > Software Sources > PPAsorAdditional Repositoriestabs. - Make sure you have a minimum of 10 GB to 15 GB of free disk space in the root file system.
- (Optional) Prepare a LIVE USB of Linux Mint 20.3 if you cannot boot it after a failed upgrade. It will help to restore via Timeshift.
- (Optional) Finally, do a fresh reboot before you follow the steps.
- Ensure you have a stable internet connection and have around 1.5 hours to give attention to the upgrade process.
Upgrade to Linux Mint 21, 21.1 from Linux Mint 20.3 [Graphical Method]
- Open a terminal window and run the following command to install mintupgrade utility. This is a GUI-based program which Linux Mint modified for major version upgrades. It makes the upgrade easier for general users who are not comfortable with the command prompt.
sudo apt install mintupgrade
- Now, from the command, run the program.
sudo mintupgrade
- You should see the following prompt, which tells you the ‘upgrade to Linux Mint 21’ is available. Click on Let’s Go. If you are running this after December 20th, then you should see a prompt ‘upgrade to Linux mint 21.1 Vera’.
- The tool will verify your system for any problems and tell you to fix them. If you see a FIX button, click on that to resolve the error (after reading the details in the window).
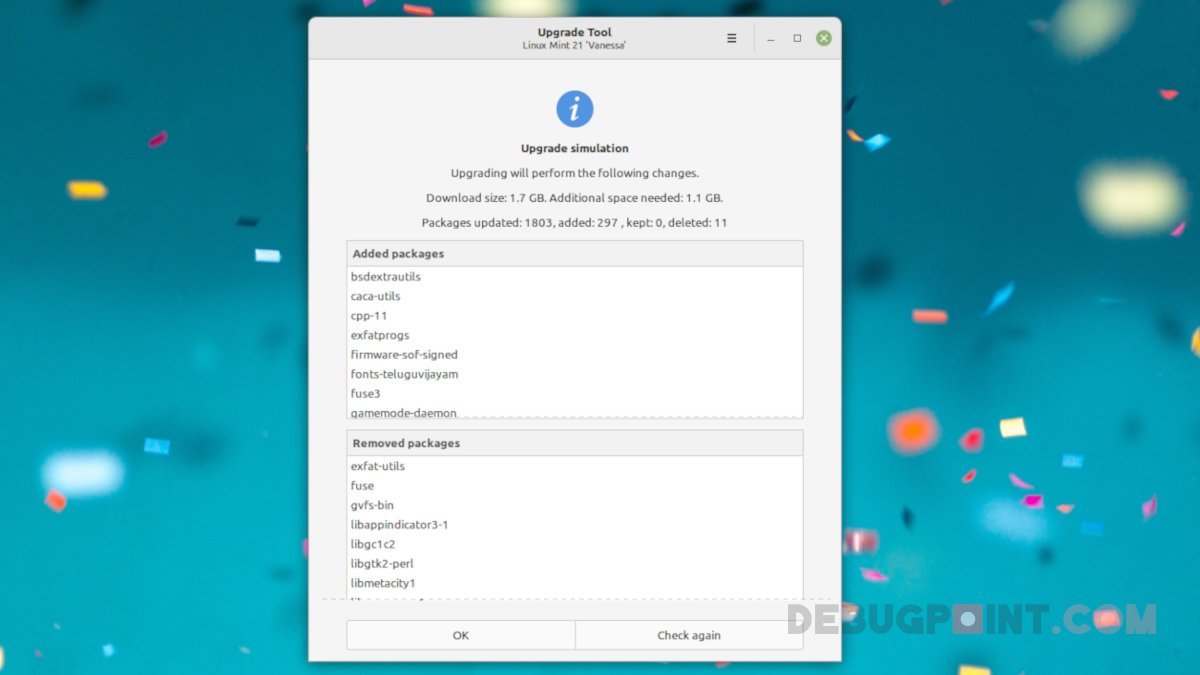
- It will also give you a list of packages which require a downgrade.
- In the end, you should see a summary of the packages to be downloaded or removed.
- Press OK to start the upgrade process.
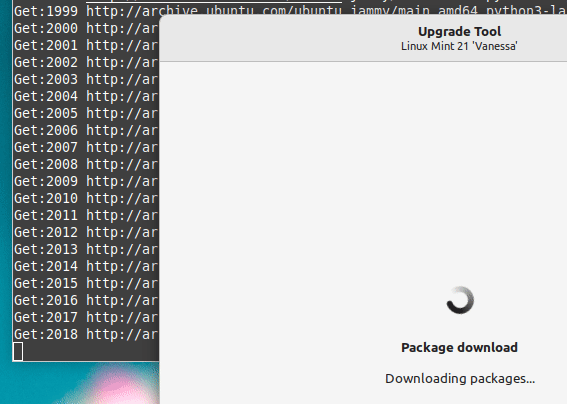
- The program first downloads the packages. Then start to upgrade each one of the packages. Wait for the process to finish for close to an hour (based on your standard internet speed).
- After the download and installation, you should see a successful upgrade prompt.
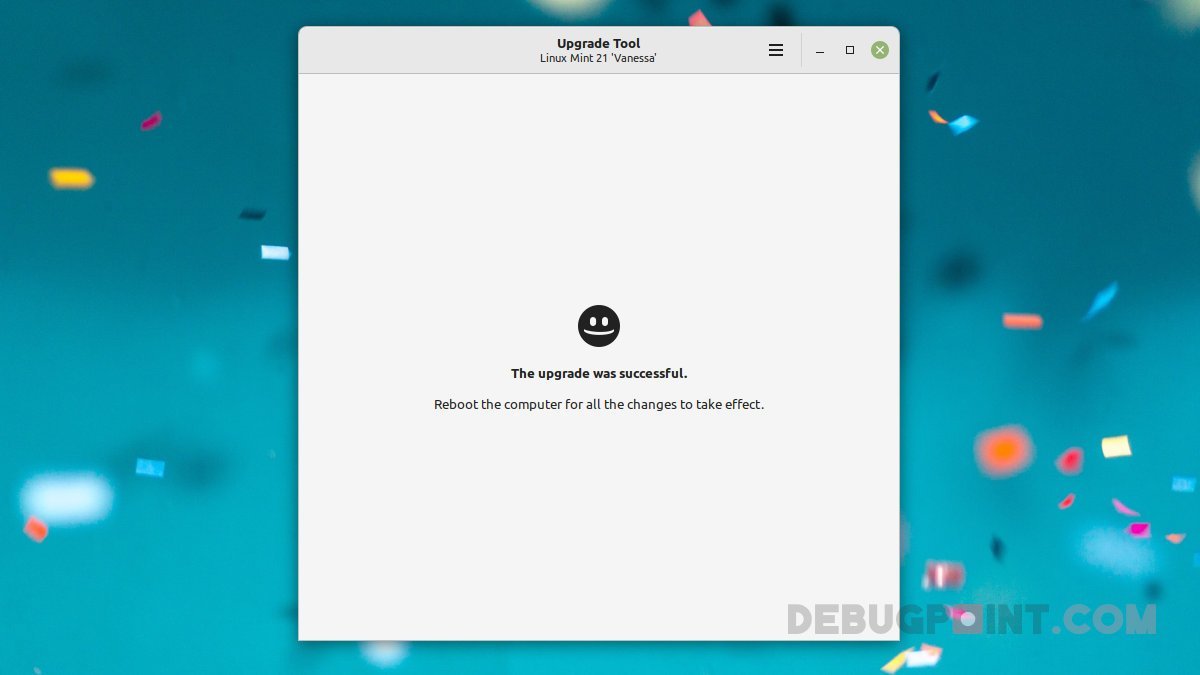
- Now, reboot the system, and you should be greeted with brand new Linux Mint 21.
Things to remember during the Upgrade
- Usually, the upgrade process is smooth and should not be an issue. It takes around 1 hour and 15 minutes for a base install.
- The upgrade process may seem stalled sometime up to ~10 minutes, and you may not see any visible progress on the screen other than the progress animation.
- So, you need to wait until it completes all the steps. Alternatively, you can also watch the status in the terminal window.
- If you end up with a broken upgrade system, you can boot from a LIVE Mint USB/CD and restore your system with Timeshift backup.
If the upgrade fails, you may try for a new upgrade via this official guide.
Post Upgrade Steps
- If you have disabled the third-party PPAs, enable them and do a system update check. You can find the third-party PPs at the
System Settings > Software Sources > PPAsorAdditional Repositoriestabs. - Verify whether your documents, pictures and videos are present.
- Also, check if your browser add-ons and extensions are working fine.
- For this version, you should also check whether your Printer and Bluetooth are working. Because Mint 21 introduces IPP (a new protocol for printing) and a new Bluetooth manager.
- Finally, you may want to check out the Top 10 features of Linux Mint 21 before you start using it.
Wrapping Up
It is always better to do a fresh installation if you can afford it. However, upgrades are also acceptable.
I hope this guide helped you to do the Linux Mint upgrade. If you face any issues, let me know using the comment box below.
Source: https://www.debugpoint.com/upgrade-linux-mint-21-from-20-3/